이 글을 읽고 계신다면 iOS 앱에 마법을 한번 부려보고 싶은 분이시겠죠. 이번에는 앱을 돋보이게 하고 사용자를 즐겁게 할 그런 환상적인 마법을 한층 더 멋지게 만들 방법을 알아보겠습니다.

iOS 앱에 사용되는 Lottie 애니메이션에 마법의 가루를 뿌려 보세요.
어떻게 할 수 있냐고요? 물론, 다양한 방법이 있지만, 여기에서는 Lottie를 사용하는 방법을 배워 볼게요.
이 글에서 다룰 내용
글을 다 읽고 나면 iOS 앱에 커스텀 Lottie 애니메이션을 활용하는 방법을 이해하고 직접 해보실 수 있을 거예요. 그러면 함께 만들어볼 애니메이션을 확인해 볼까요.

Lottie가 뭐죠?
Lottie는 JSON 기반의 애니메이션 파일 형식을 말합니다. 디자이너가 Lottie를 통해 어느 플랫폼에서나 정적 애셋만큼 쉽게 애니메이션을 활용할 수 있죠. 자세한 내용은 여기에서 읽어 보세요.
알겠어요. 이제 준비됐어요! 뭐부터 시작할까요?
좋습니다. 그럼 먼저 Xcode를 열고 새 iOS 프로젝트를 생성해 보죠.
- Xcode를 열고 "Create new Xcode project"를 선택합니다.
- iOS를 선택한 다음, "Single View App"을 선택합니다.

- 프로젝트 이름, 단체 및 식별자를 추가합니다. Swift와 Storyboard를 선택한 다음, Next를 누르고 Create를 누르세요.

잘하셨습니다. 이제 프로젝트가 준비되었으니 Lottie 라이브러리를 추가해 보죠. 프로젝트에 Lottie를 추가하는 방법이 몇 가지 있지만, 이번 튜토리얼에서는 가장 유명한 CocoaPods를 사용해 볼게요.
시작하려면 프로젝트를 닫고 터미널을 열어 프로젝트의 루트 폴더로 이동합니다. 이제 다음을 입력하고 실행하세요.
pod init

프로젝트의 루트 폴더에 Podfile이라는 이름의 파일이 생성되었습니다. 이제 아무 텍스트 편집기(Xcode도 가능)를 사용해 파일을 여세요. 그런 다음 내용을 다음 코드로 변경합니다.
# 1. Uncomment the next line to define a global platform for your project
platform :ios, '13.0'

# 2. Target to add frameworks to

target 'LottieTutorial' do

# 3. Frameworks to be imported
  pod 'lottie-ios'

end
저장하고 Mac에서 터미널을 열어 프로젝트의 루트 폴더로 이동한 후 다음을 입력하고 실행합니다.
pod install
완료되면 xcworkspace 파일을 두 번 눌러 엽니다.

ViewController.swift로 이동한 다음, 파일 상단에 다음 행을 추가하세요.
import Lottie
CMD+B 키를 누르고 내용을 확인하세요.

좋습니다. 이제 재미있는 부분입니다! 바로 애니메이션이죠!!!
LottieFiles에서는 1,000개의 무료 애니메이션이 제공되지만, 이번 튜토리얼의 목적은 함께 배워보는 것이니 이 애니메이션을 사용해 볼게요.
iOS에서 모든 Lottie 기능이 지원되지 않는 경우도 있기 때문에 선택한 Lottie가 iOS에서 작동하는지 테스트해보는 것이 매우 중요합니다. 테스트하려면 iOS용 LottieFiles 앱을 다운로드하고 LottieFiles에 업로드하거나 테스트하는 애니메이션 밑 하단에 생성된 QR 코드를 스캔하세요. 애니메이션이 정상적으로 재생된다고 판단되면 Lottie 파일을 다운로드하세요.
다운로드한 파일을 끌어서 프로젝트에 놓고 프로젝트가 대상으로 선택되었는지, Copy items if needed가 선택되었는지 확인하세요.

코드로 Lottie 애니메이션 뷰 추가하기
ViewController.swift 파일에서 viewDidLoad 메서드를 다음으로 대체합니다.
// 1. Create the AnimationView
private var animationView: AnimationView?

override func viewDidLoad() {

  super.viewDidLoad()

  // 2. Start AnimationView with animation name (without extension)

  animationView = .init(name: "coffee")

  animationView!.frame = view.bounds

  // 3. Set animation content mode

  animationView!.contentMode = .scaleAspectFit

  // 4. Set animation loop mode

  animationView!.loopMode = .loop

  // 5. Adjust animation speed

  animationView!.animationSpeed = 0.5

  view.addSubview(animationView!)

  // 6. Play animation

  animationView!.play()

}
잘하셨어요! 이제 CMD+R 키를 누르면 다음과 같이 보이게 됩니다.

이제 다른 구성으로도 해 보시면 좋을 것 같네요.
인터페이스 빌더를 사용해 Lottie 애니메이션 뷰 추가하기
Storyboard나 Xib 파일에서 UIView를 끌어서 ViewController에 놓고 원하는대로 제약과 위치를 추가합니다. 그런 다음 상단 오른쪽에 있는 Identity Inspector로 이동해 클래스를 AnimationView로 변경하고 모듈을 Lottie로 지정하세요.

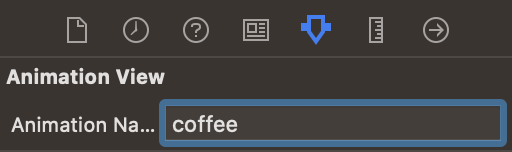
이제 상단 오른쪽에 있는 Attribute Inspector로 이동해 애니메이션 파일의 이름(확장자 제외)을 추가합니다.
CTRL+OPTION+CMD+ENTER 키를 눌러 ViewController 클래스를 열고 OPTION 키를 누른 상태에서 뷰를 끌어서 ViewController Enclosure 상단에 놓습니다.

연결되면 오른쪽 옆에 있는 편집기를 닫고 ViewController.swift로 이동한 다음, viewDidLoad 함수를 다음으로 대체합니다.
override func viewDidLoad() {

  super.viewDidLoad()

  // 1. Set animation content mode

  animationView.contentMode = .scaleAspectFit

  // 2. Set animation loop mode

  animationView.loopMode = .loop

  // 3. Adjust animation speed

  animationView.animationSpeed = 0.5

  // 4. Play animation
  animationView.play()
}
이제 CMD+R 키를 눌러 테스트해 보세요. 뷰를 어떻게 놓았는지를 고려하면, 결과가 위와 비슷하게 나와야 합니다.
진행 애니메이션 사용
좋습니다. 그럼 Lottie 애니메이션을 사용하는 방법을 알았으니, 이번에는 상태가 다른 진행 바나 애니메이션과 같이 애니메이션 재생을 조정할 수 있는 마법의 손길이 필요하겠죠. 이번 예제에서는 이 파일을 가지고 다운로드 진행 애니메이션을 만들어 볼게요. 전과 동일하게 파일을 다운로드하고, 끌어서 프로젝트에 놓으세요.
LottieFiles에서 파일을 열면 애니메이션 진행을 슬라이드로 움직일 수 있습니다.

잘 움직이면 애니메이션의 각 부분에 대한 정확한 프레임(하단 왼쪽에서 확인 가능)을 확인하실 수 있어요. 위 예제에서는 세 가지 주요 프레임 위치를 확인할 수 있습니다.
- 진행 시작: 140
- 진행 종료: 187
- 다운로드 완료: 240
그럼 나머지 프레임은 뭘까요?
- 0->140: 애니메이션 시작
- 240->320: 원래 상태로 복귀
이러한 값을 가지고 더 쉽게 사용할 수 있도록 열거형을 생성해 볼게요.
enum ProgressKeyFrames: CGFloat {

  case start = 140

  case end = 187

  case complete = 240

}
이제 viewDidLoad에서 AnimationView를 설정합니다.
private var progressView: AnimationView?

override func viewDidLoad() {

  super.viewDidLoad()
  // make sure the name of the animation matches the imported file

  progressView = .init(name: "download")

  progressView!.frame = view.bounds

  progressView!.contentMode = .scaleAspectFit

  view.addSubview(progressView!)

}
다운로드 시작, 완료까지 진행, 다운로드 완료에 함수 3개를 더 추가합니다.
// start the download

private func startProgress() {

  // play from frame 0 to the start download of progress

  progressView?.play(fromFrame: 0, toFrame: ProgressKeyFrames.start.rawValue, loopMode: .none) { [weak self] (_) in

    self?.startDownload()

  }

}

// progress from 0 to 100%

private func startDownload() {

  // play animation from start to end of download progress

  progressView?.play(fromFrame: ProgressKeyFrames.start.rawValue, toFrame: ProgressKeyFrames.end.rawValue, loopMode: .none) { [weak self] (_) in

    self?.endDownload()

  }

}

// download is completed, we show the completion state

private func endDownload() {

  // download is completed, we show the completion state

  progressView?.play(fromFrame: ProgressKeyFrames.end.rawValue, toFrame: ProgressKeyFrames.complete.rawValue, loopMode: .none)

}
마지막으로, 테스트하려면 viewDidLoad 메서드의 마지막 뒤에 다음을 추가하세요.
override func viewDidAppear(_ animated: Bool) {

  super.viewDidAppear(animated)

  startProgress()

}
이제 됐습니다. 앱을 실행하면 다음과 같이 보이게 됩니다.

멋지군요! 이제 전체 애니메이션이 보이네요! 하지만 이제 파일을 다운로드할 때 어떻게 보이는지 알고 싶으시겠죠. 그럼 방법을 알려 드릴게요.
먼저, startDownload 함수를 다음으로 대체할게요.
// start download

private func startDownload() {

  // 1. URL to download from

  let url = URL(string: "https://archive.org/download/SampleVideo1280x7205mb/SampleVideo_1280x720_5mb.mp4")!

  // 2. Setup download task and start download

  let configuration = URLSessionConfiguration.default

  let operationQueue = OperationQueue()

  let session = URLSession(configuration: configuration, delegate: self, delegateQueue: operationQueue)

  let downloadTask = session.downloadTask(with: url)

  downloadTask.resume()

}
이제 다운로드 작업 이벤트를 처리하려면 ViewController.swift 파일 하단에 이 코드를 추가하세요.
// MARK: - Download Delegate

extension ViewController: URLSessionDownloadDelegate {
  // handles download progress

  func urlSession(_ session: URLSession, downloadTask: URLSessionDownloadTask, didWriteData bytesWritten: Int64, totalBytesWritten: Int64, totalBytesExpectedToWrite: Int64) {

    let percentDownloaded: CGFloat = CGFloat(totalBytesWritten) / CGFloat(totalBytesExpectedToWrite)

    DispatchQueue.main.async {

      self.progress(to: percentDownloaded)

    }

  }


  // finishes download

  func urlSession(_ session: URLSession, downloadTask: URLSessionDownloadTask, didFinishDownloadingTo location: URL) {

    DispatchQueue.main.async {

      self.endDownload()

    }

  }

}
마지막으로, 올바르게 진행되는 애니메이션을 표시하기 위해 startDownload 함수 뒤에 다음 코드를 추가합니다.
// sets download progress

private func progress(to progress: CGFloat) {

  // 1. We get the range of frames specific for the progress from 0-100%

  let progressRange = ProgressKeyFrames.end.rawValue - ProgressKeyFrames.start.rawValue

  // 2. Then, we get the exact frame for the current progress

  let progressFrame = progressRange * progress

  // 3. Then we add the start frame to the progress frame
  // Considering the example that we start in 140, and we moved 30 frames in the progress, we should show frame 170 (140+30)

  let currentFrame = progressFrame + ProgressKeyFrames.start.rawValue

  // 4. Manually setting the current animation frame

  progressView?.currentFrame = currentFrame

  print("Downloading \((progress*100).rounded())%")

}
CMD+R 키를 다시 눌러 코드를 실행하면 전과 동일하지만, 이번에는 실제 다운로드 진행이 표시되죠. 정말 깔끔하지 않나요?
튜토리얼은 여기까지입니다. 이제 여러분도 애니메이션을 쉽게 활용하고 진행을 조정하실 수 있겠죠. 앞으로 일어날 가능성을 상상해 보세요. 이제 더 이상 시간 낭비하지 말고, 마법 같은 iOS 앱을 만들어 보세요!

본 튜토리얼의 전체 코드는 여기에서 확인하실 수 있습니다.
그럼 즐겁게 코딩하세요!
Working with Lottie 블로그 섹션에서 Lottie로 다른 무엇을 할 수 있는지 더 확인해 보세요.