iOSアプリにちょっとした魔法を加える準備ができました。アプリに優位性を与え、ユーザーがそれを見て思わずうれしくなるような小さな要素を散りばめる時が来ました。

LottieのアニメーションをiOSアプリにちりばめるときが来ました。
「どうすればそれができるの?」という声が聞こえてくるようですが、多くの方法がある中で、ここではLottieでの使用方法をみていきます。
この記事で取り上げる内容
この記事の終わりまでに、Lottieのカスタム アニメーションを使用して、独自のiOSアプリを作成できるようになります。 そして、一緒に構築していくのはこちらです:
Lottieとは?
LottieはJSONベースのアニメーションファイル形式です。デザイナーはこれを使うことで、静止画アセットと同じくらい簡単に、アニメーションをあらゆるプラットフォームに配信できます。 詳細については、こちらをご覧ください。
準備ができました! 何から始めたらよいですか?
Xcodeを開いて、新しいiOSプロジェクトを作成することから始めましょう。
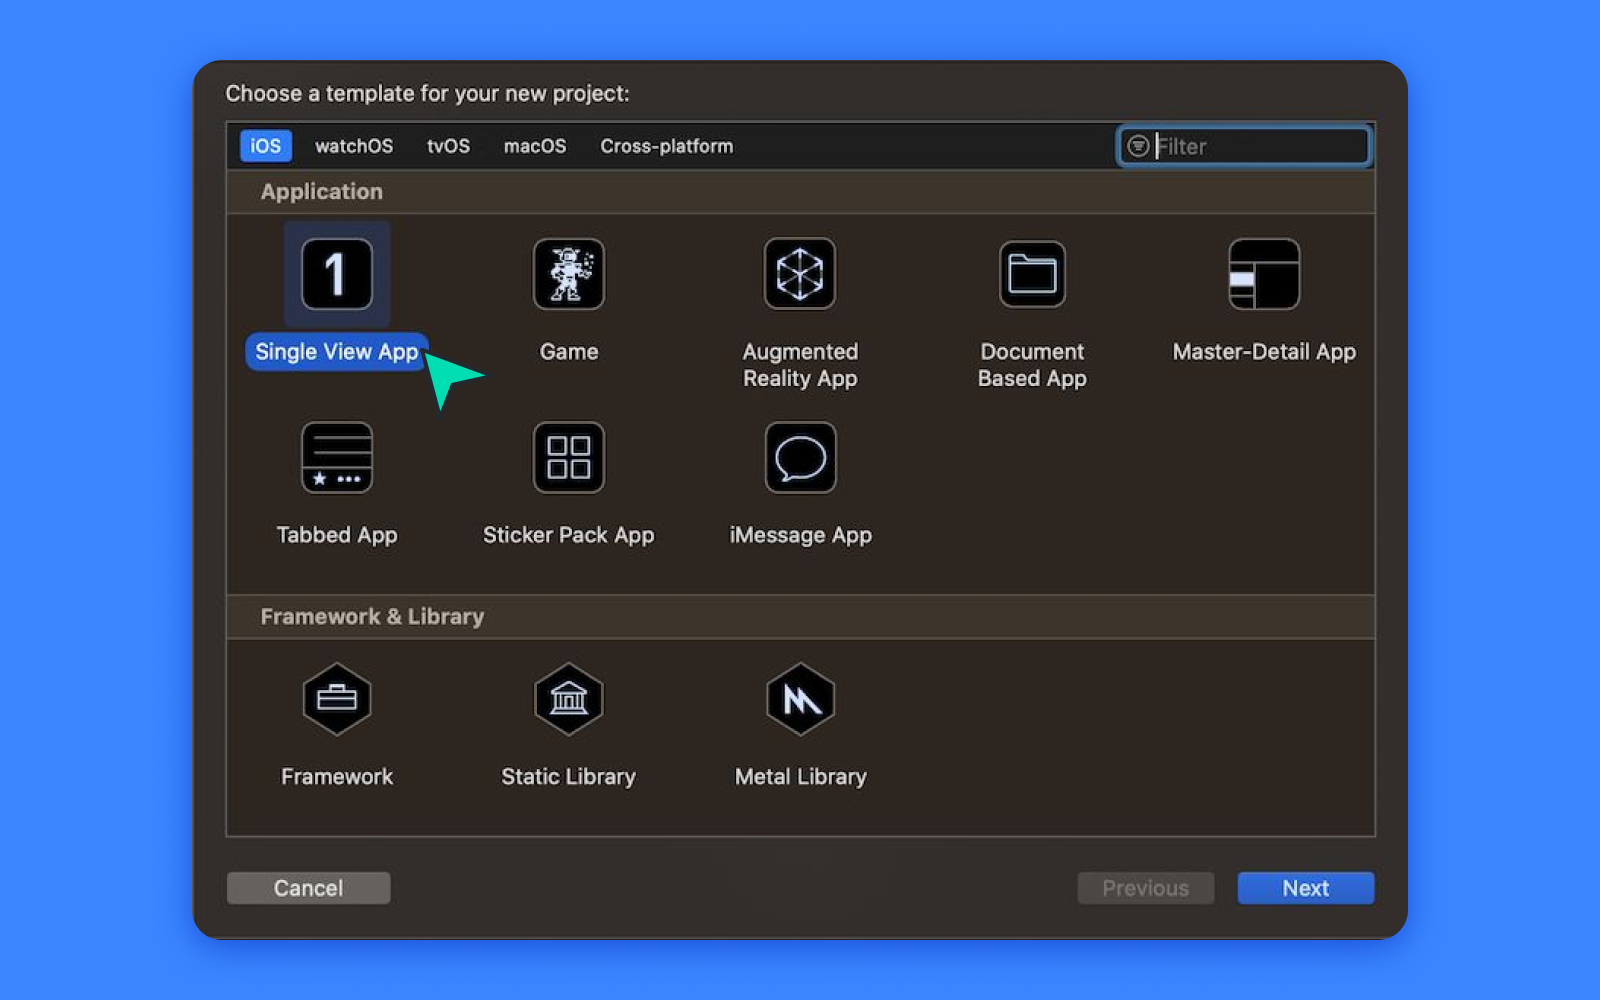
1. Xcodeを開き、[Create new Xcode project] を選択します。
2. iOSを選択し、[Single View App]を選択します。
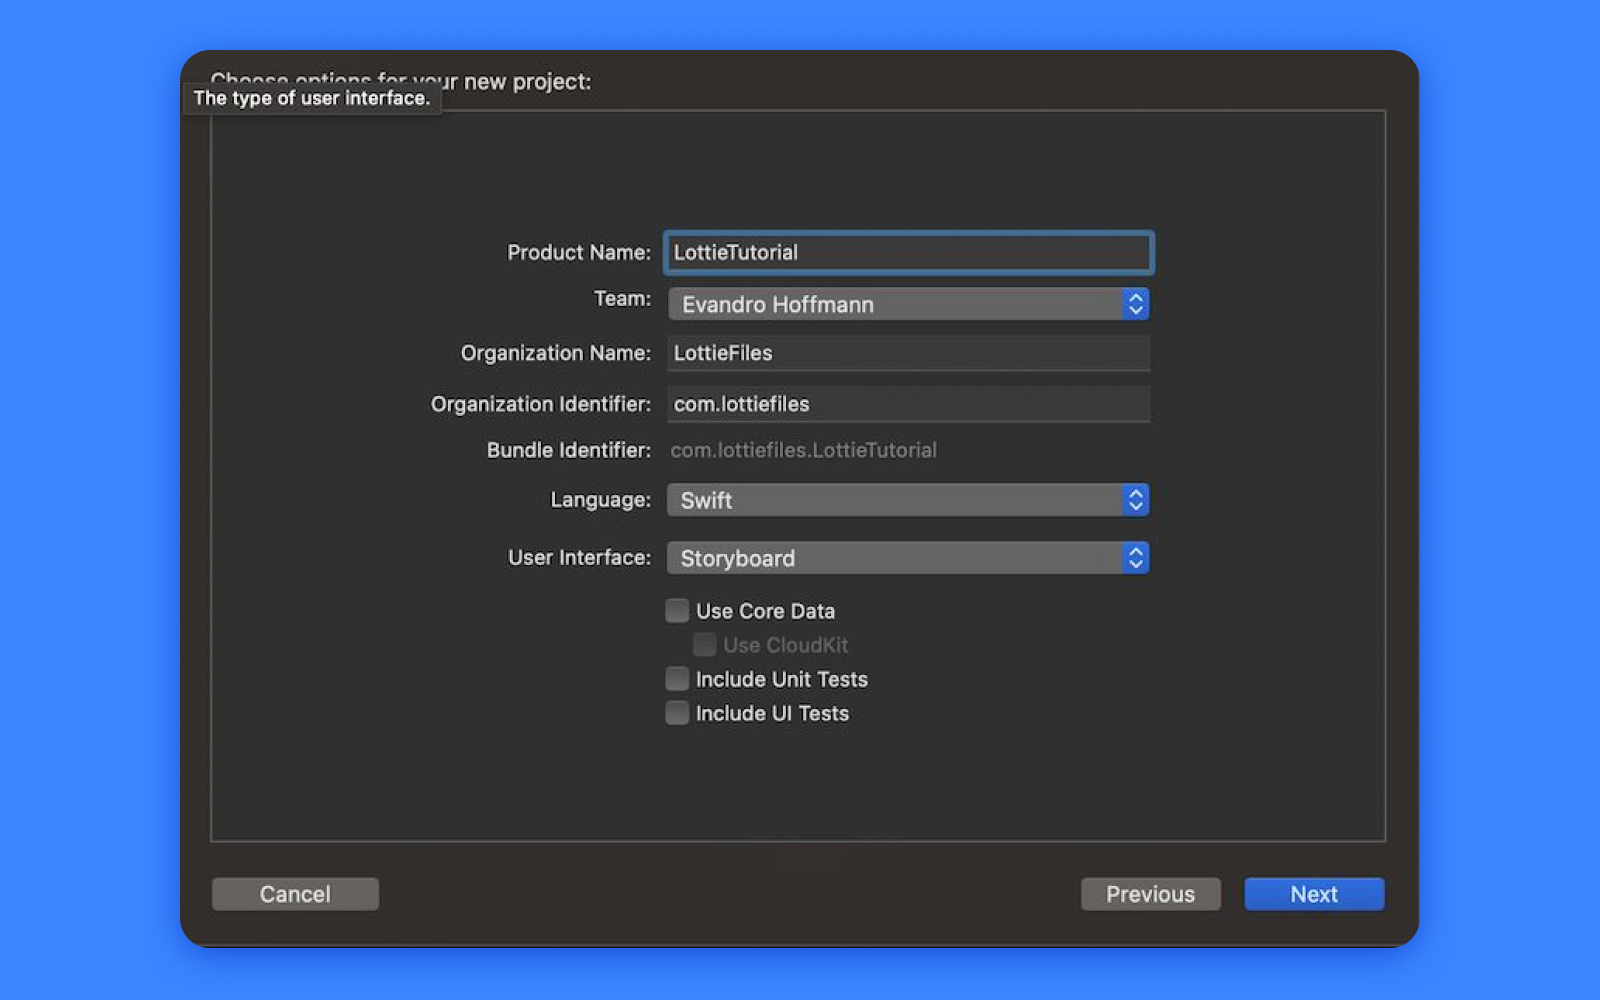
3.プロジェクト、組織、および識別子の名前を追加します。[Swift]と[Storyboard]を選択し、Next>Createで作成します。
順調です。プロジェクトの準備ができたので、Lottieライブラリを追加しましょう。 Lottieをプロジェクトに追加する方法はいくつかありますが、このチュートリアルではSwift Package Manager(SPM)を使用します。上記のチュートリアルのビデオバージョンではCocoaPodsを使用していることに注意してください。必要に応じて今でもCocoaPodsを使用することもできますが、SPM を使用することで多少の手間が省けます。
やり方は次のとおりです。Xcodeにフォーカスした状態で、上部のナビゲーション バーで[File->Add Packages…]を選択し、上部で [Search] または [Enter Package URL]を右タップして、URLを入力します。
https://github.com/airbnb/lottie-ios.git
右下隅にある [Add Package]をタップし、プロジェクトをターゲットとして選択します。これで統合の完了です! 😄
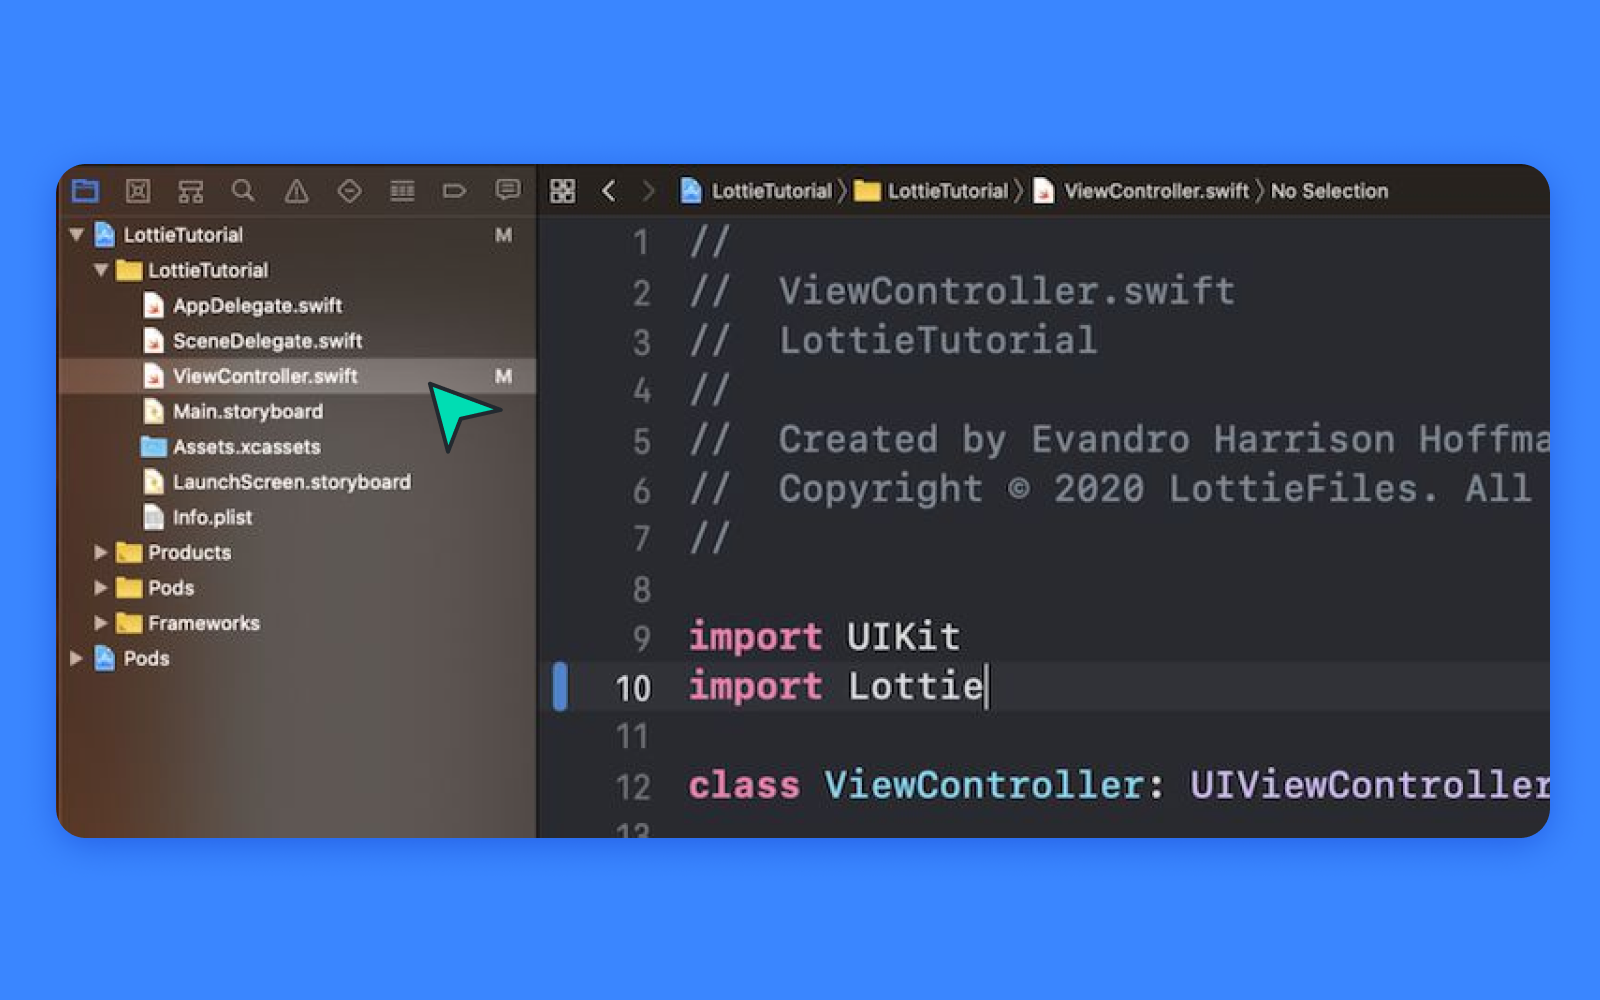
ViewController.swift に移動して、次のラインをファイルの先頭に追加します。
import Lottie
CMD + B を押して、すべてに問題がないことを確認してください
素晴らしい。これからが楽しい部分です! アニメーションにしていきましょう!!
LottieFilesにある1,000以上の無料のアニメーションから選択できますが、このチュートリアルでは一緒に作業を行っていくので、まず最初にこちらのアニメーションを使用します。
Lottieのすべての機能がiOSでサポートされているとは限らないため、選択したLottieがiOSで動作するかテストを行うことが非常に重要です。テストを行うには、必ずiOS用のLottieFilesアプリをダウンロードし、LottieFilesにアップロードされるか、またはLottieFilesでテストされたアニメーションの下に生成されるQRコードをスキャンしてください。アニメーションの外観とそれがどのように再生されるか確認したらLottieファイルをダウンロードします。
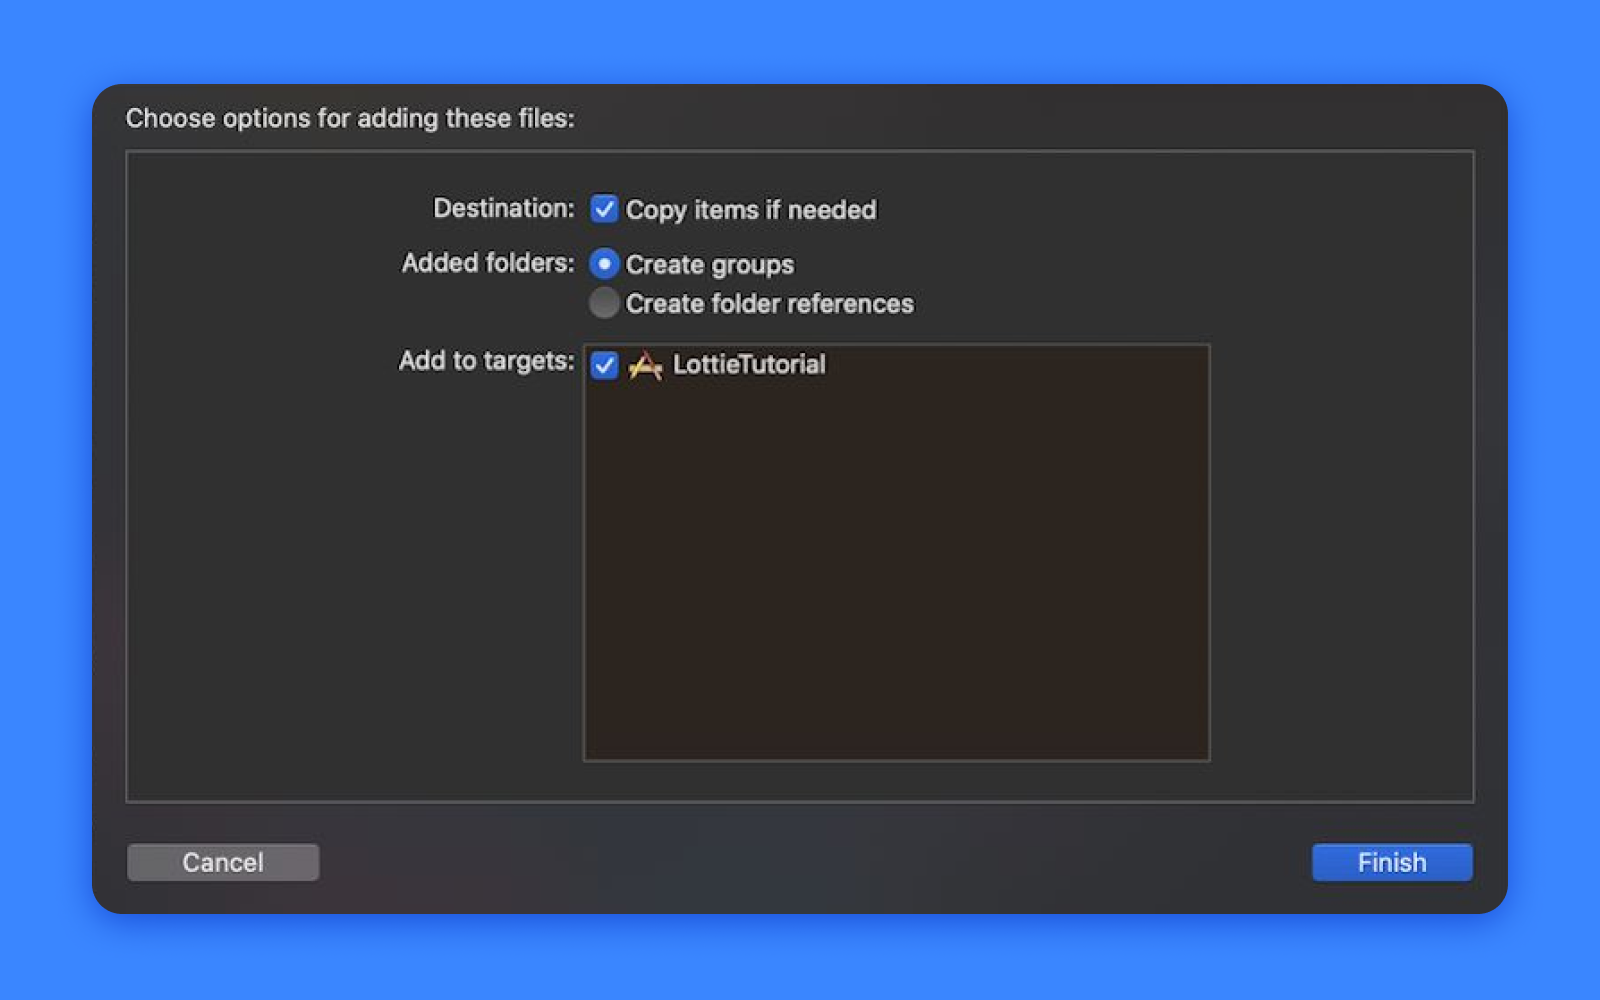
ダウンロードをしたら、プロジェクトにドラッグ アンド ドロップし、プロジェクトがターゲットとして選択されていることと、「必要に応じて項目をコピーする」が選択されていることを確認します。
コードによるLottieアニメーション ビューの追加
ViewController.swift fileで、viewDidLoadメソッドを次のように置き換えます。
// 1. Create the LottieAnimationView
private var animationView: LottieAnimationView?
override func viewDidLoad() {
super.viewDidLoad()
// 2. Start LottieAnimationView with animation name (without extension)
animationView = .init(name: "coffee")
animationView!.frame = view.bounds
// 3. Set animation content mode
animationView!.contentMode = .scaleAspectFit
// 4. Set animation loop mode
animationView!.loopMode = .loop
// 5. Adjust animation speed
animationView!.animationSpeed = 0.5
view.addSubview(animationView!)
// 6. Play animation
animationView!.play()
}
できました! CMD+Rを押すと、次のように表示されます。
この時点で、さまざまな構成を試してみることを強くお勧めします。
Interface Builderを使用してLottieアニメーション ビューを追加する
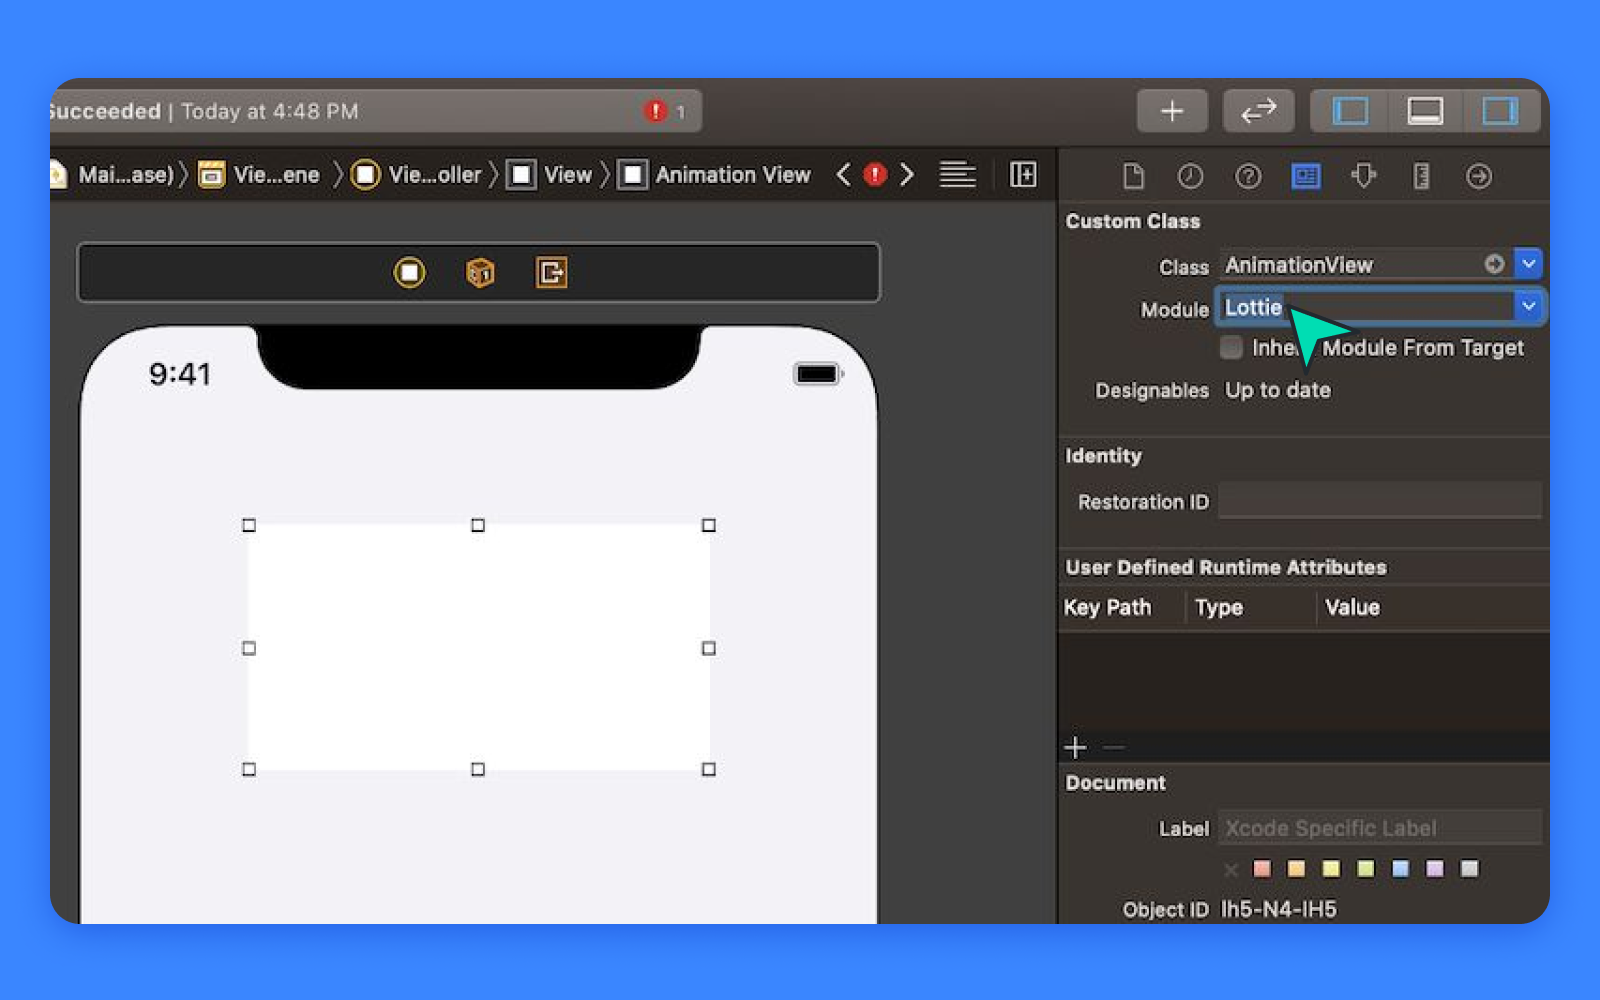
StoryboardまたはXib fileで、UIViewをViewControllerにドラッグ アンド ドロップし、希望するConstrainと位置をお好みで追加します。次に、右上隅のIdentity Inspectorに移動し、クラスをLottieAnimationViewに変更し、モジュールをLottieに設定します。
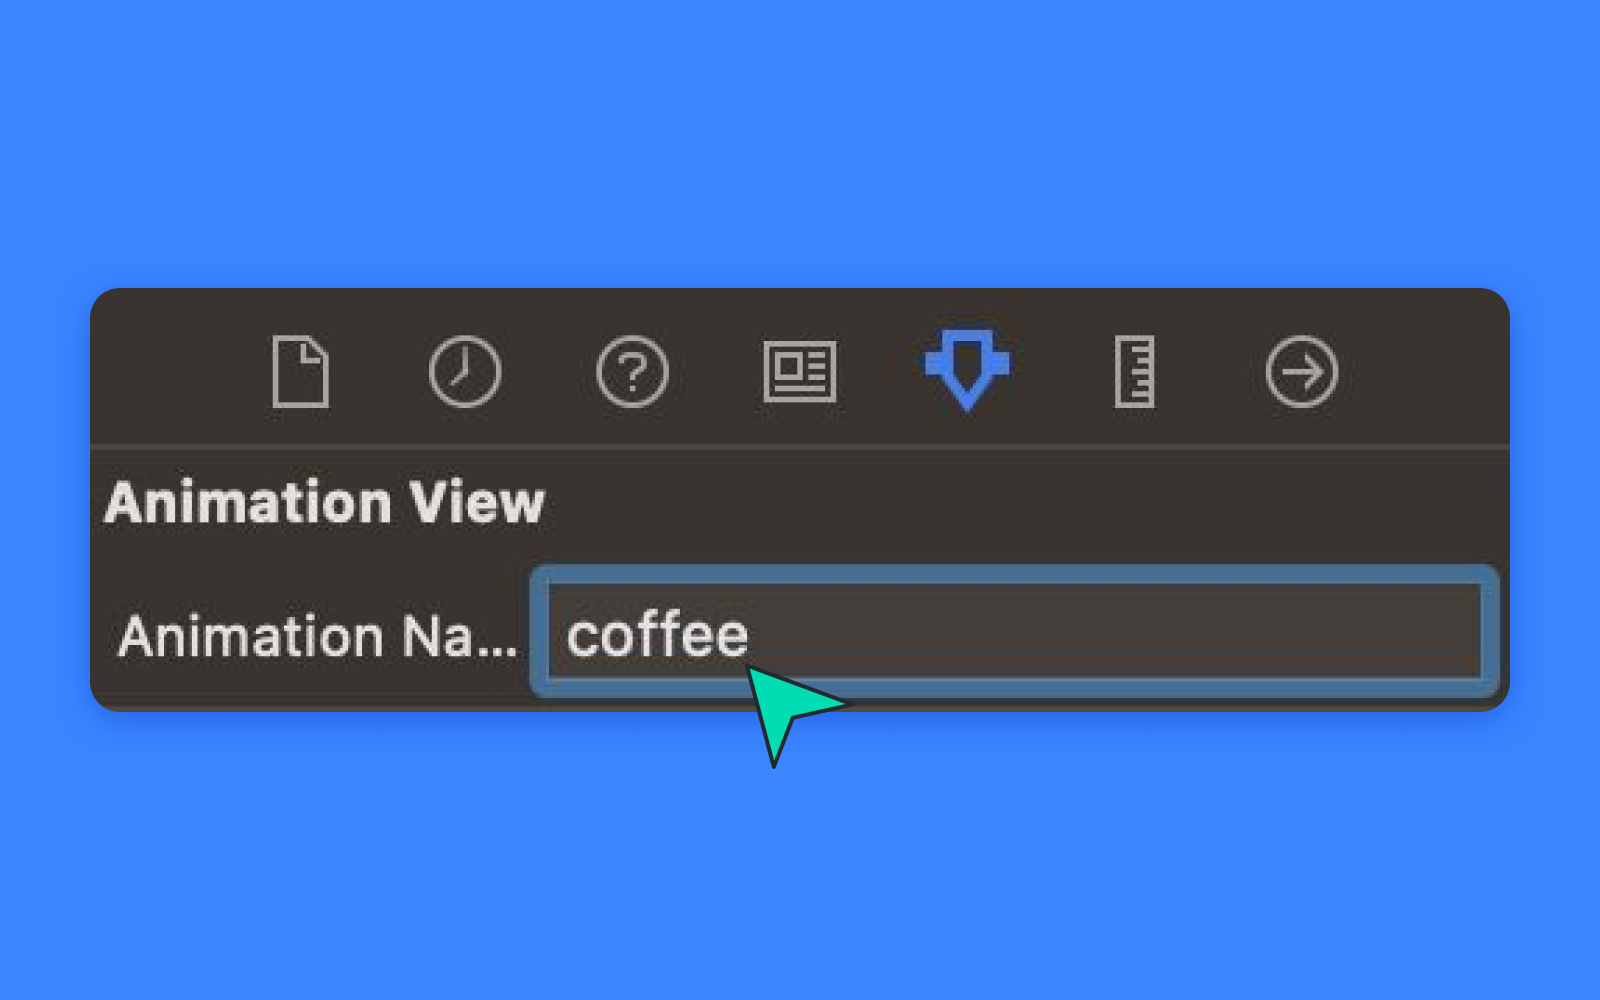
次に、右上隅のAttribute Inspectorに移動し、アニメーション ファイルの名前を(拡張子なしで)追加します。
キーボードで、CTRL+OPTION+CMD+ENTERを押してViewControllerクラスを開き、OPTION+DragでビューをController Enclosureの上部にドラッグします。

リンクしたら、右側のEditorを閉じて、ViewController.swiftに移動します。 viewDidLoadファンクションを次のように置き換えます。
override func viewDidLoad() {
super.viewDidLoad()
// 1. Set animation content mode
animationView.contentMode = .scaleAspectFit
// 2. Set animation loop mode
animationView.loopMode = .loop
// 3. Adjust animation speed
animationView.animationSpeed = 0.5
// 4. Play animation
animationView.play()
}
CMD+Rを押してテストします。ビューをどのように配置したかにもよりますが、結果は上記のようなものになるはずです。
プログレス アニメーションの使用
これでLottieのアニメーションの使用方法を把握することができましたが、次にアプリケーションに少々魔法を加える必要があります。プログレスバーやさまざまな状態のアニメーションなどを加えることで、アニメーションの再生方法を制御できるようになります。例では、このファイルを使用してダウンロードの際のプログレス アニメーションを作成します。 先ほどと同じようにファイルをダウンロードして、プロジェクトにドラッグ アンド ドロップします。
LottieFilesでファイルを開くと、アニメーションの進行状況をスライドできます。

よく注意すれば、アニメーションの各部分の正確なフレームを見つけることができます(左下隅にあります)。 上記の例では、3つのキー フレームが見つかりました。
- プログレス開始: 140
- プログレス終了: 187
- ダウンロード完了:240
残りのフレームについてはどうでしょうか?
- 0->140:アニメーションの開始
- 240->320:元の状態にリセット中
これらの値を使用して使いやすくするために、ENUMを作成します。
enum ProgressKeyFrames: CGFloat {
case start = 140
case end = 187
case complete = 240
}
次に、viewDidLoadにLottieAnimationViewをセットアップします。
private var progressView: LottieAnimationView?
override func viewDidLoad() {
super.viewDidLoad()
// make sure the name of the animation matches the imported file
progressView = .init(name: "download")
progressView!.frame = view.bounds
progressView!.contentMode = .scaleAspectFit
view.addSubview(progressView!)
}
さらに、ダウンロードを開始し、完了まで進行し、最後にダウンロードを完了するという3つのファンクションを追加します。
// start the download
private func startProgress() {
// play from frame 0 to the start download of progress
progressView?.play(fromFrame: 0, toFrame: ProgressKeyFrames.start.rawValue, loopMode: .none) { [weak self] (_) in
self?.startDownload()
}
}
// progress from 0 to 100%
private func startDownload() {
// play animation from start to end of download progress
progressView?.play(fromFrame: ProgressKeyFrames.start.rawValue, toFrame: ProgressKeyFrames.end.rawValue, loopMode: .none) { [weak self] (_) in
self?.endDownload()
}
}
// download is completed, we show the completion state
private func endDownload() {
// download is completed, we show the completion state
progressView?.play(fromFrame: ProgressKeyFrames.end.rawValue, toFrame: ProgressKeyFrames.complete.rawValue, loopMode: .none)
}
最後に、それをテストするために、viewDidLoadメソッドの末尾に次を追加します。
override func viewDidAppear(_ animated: Bool) {
super.viewDidAppear(animated)
startProgress()
}
それだけです。アプリケーションを実行すると、次のように表示されます。
素晴らしい! 完全なアニメーションができあがりました! しかし、ファイルをダウンロードするときにどのように見えるかを知りたい場合があります。 方法は次のとおりです。
まず、startDownloadファンクションを次のように置き換えます。
// start download
private func startDownload() {
// 1. URL to download from
let url = URL(string: "https://archive.org/download/SampleVideo1280x7205mb/SampleVideo_1280x720_5mb.mp4")!
// 2. Setup download task and start download
let configuration = URLSessionConfiguration.default
let operationQueue = OperationQueue()
let session = URLSession(configuration: configuration, delegate: self, delegateQueue: operationQueue)
let downloadTask = session.downloadTask(with: url)
downloadTask.resume()
}
次に、ダウンロード タスク イベントを処理するために、このコードをViewController.swift fileの最後に追加します。
// MARK: - Download Delegate
extension ViewController: URLSessionDownloadDelegate {
// handles download progress
func urlSession(_ session: URLSession, downloadTask: URLSessionDownloadTask, didWriteData bytesWritten: Int64, totalBytesWritten: Int64, totalBytesExpectedToWrite: Int64) {
let percentDownloaded: CGFloat = CGFloat(totalBytesWritten) / CGFloat(totalBytesExpectedToWrite)
DispatchQueue.main.async {
self.progress(to: percentDownloaded)
}
}
// finishes download
func urlSession(_ session: URLSession, downloadTask: URLSessionDownloadTask, didFinishDownloadingTo location: URL) {
DispatchQueue.main.async {
self.endDownload()
}
}
}
最後に、正しい進行状況でアニメーションを表示するために、startDownload ファンクションの後に次のコードを追加します。
// sets download progress
private func progress(to progress: CGFloat) {
// 1. We get the range of frames specific for the progress from 0-100%
let progressRange = ProgressKeyFrames.end.rawValue - ProgressKeyFrames.start.rawValue
// 2. Then, we get the exact frame for the current progress
let progressFrame = progressRange * progress
// 3. Then we add the start frame to the progress frame
// Considering the example that we start in 140, and we moved 30 frames in the progress, we should show frame 170 (140+30)
let currentFrame = progressFrame + ProgressKeyFrames.start.rawValue
// 4. Manually setting the current animation frame
progressView?.currentFrame = currentFrame
print("Downloading \((progress*100).rounded())%")
}
もう一度CMD+Rを押してコードを実行すると、前と同じ結果が表示されますが、今回は実際のダウンロードの進行状況が表示されます。素敵でしょう?
これでチュートリアルは終了です。これで、アニメーションを操作してプログレスを制御できるようになったはずです。目の前に広がる可能性を想像してみてください。もう時間を無駄にせず、iOSアプリケーションに魔法をどんどんかけていきましょう!
このチュートリアルの完全なコードは、こちらにあります。
ハッピーコーディング!
Lottieでできることの詳細については、Lottieのブログ セクションをご覧ください。