If you're reading this, it means you're ready to add that bit of extra magic to your iOS apps. It's time to sprinkle on those little bits that will give your app the edge and make your users cry with joy when they see it because it’s just so darn beautiful.

It's time to sprinkle on some Lottie animations to your iOS apps.
And how can you do this I hear you ask? Well there are many ways of course, but the one that we're going to look at here is Lottie.
What we'll cover in this article
By the end of this article, you will understand and be able to build your own iOS app with custom Lottie animations. And here’s what we are building together:
What is Lottie?
A Lottie is a JSON-based animation file format that enables designers to ship animations on any platform as easily as shipping static assets. You can read more about it here.
Ok, I’m ready! How do I start?
Awesome, let’s start by opening Xcode and creating a new iOS project.
- Open Xcode, select "Create new Xcode project"
- Select iOS, then "Single View App"
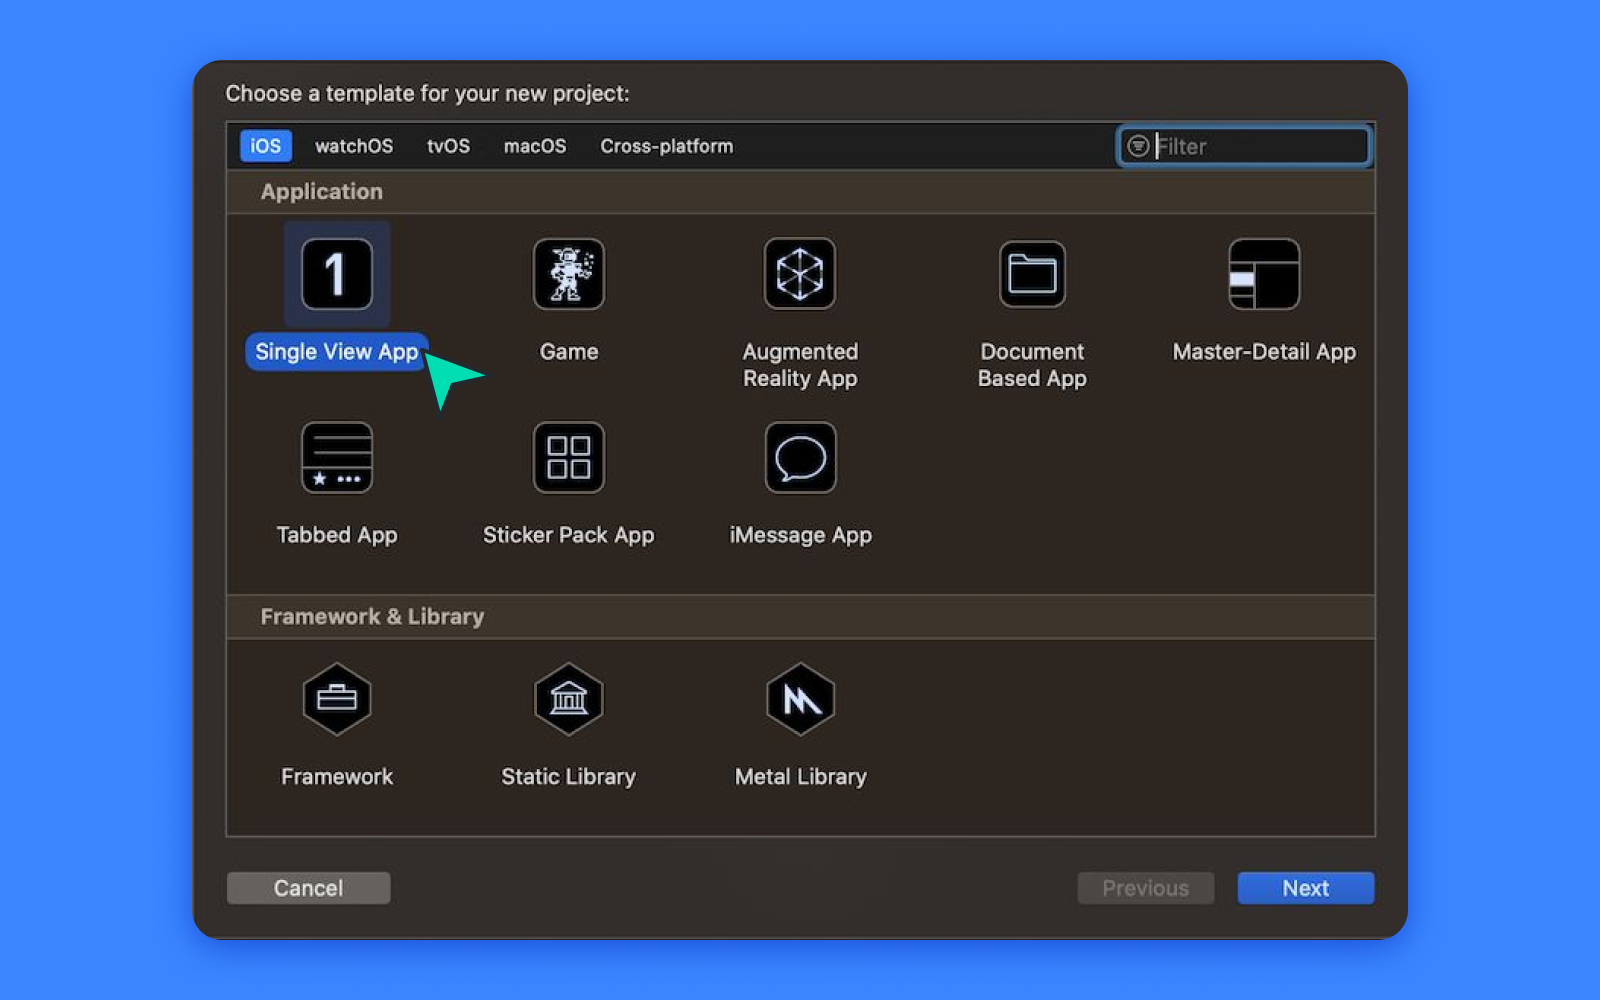
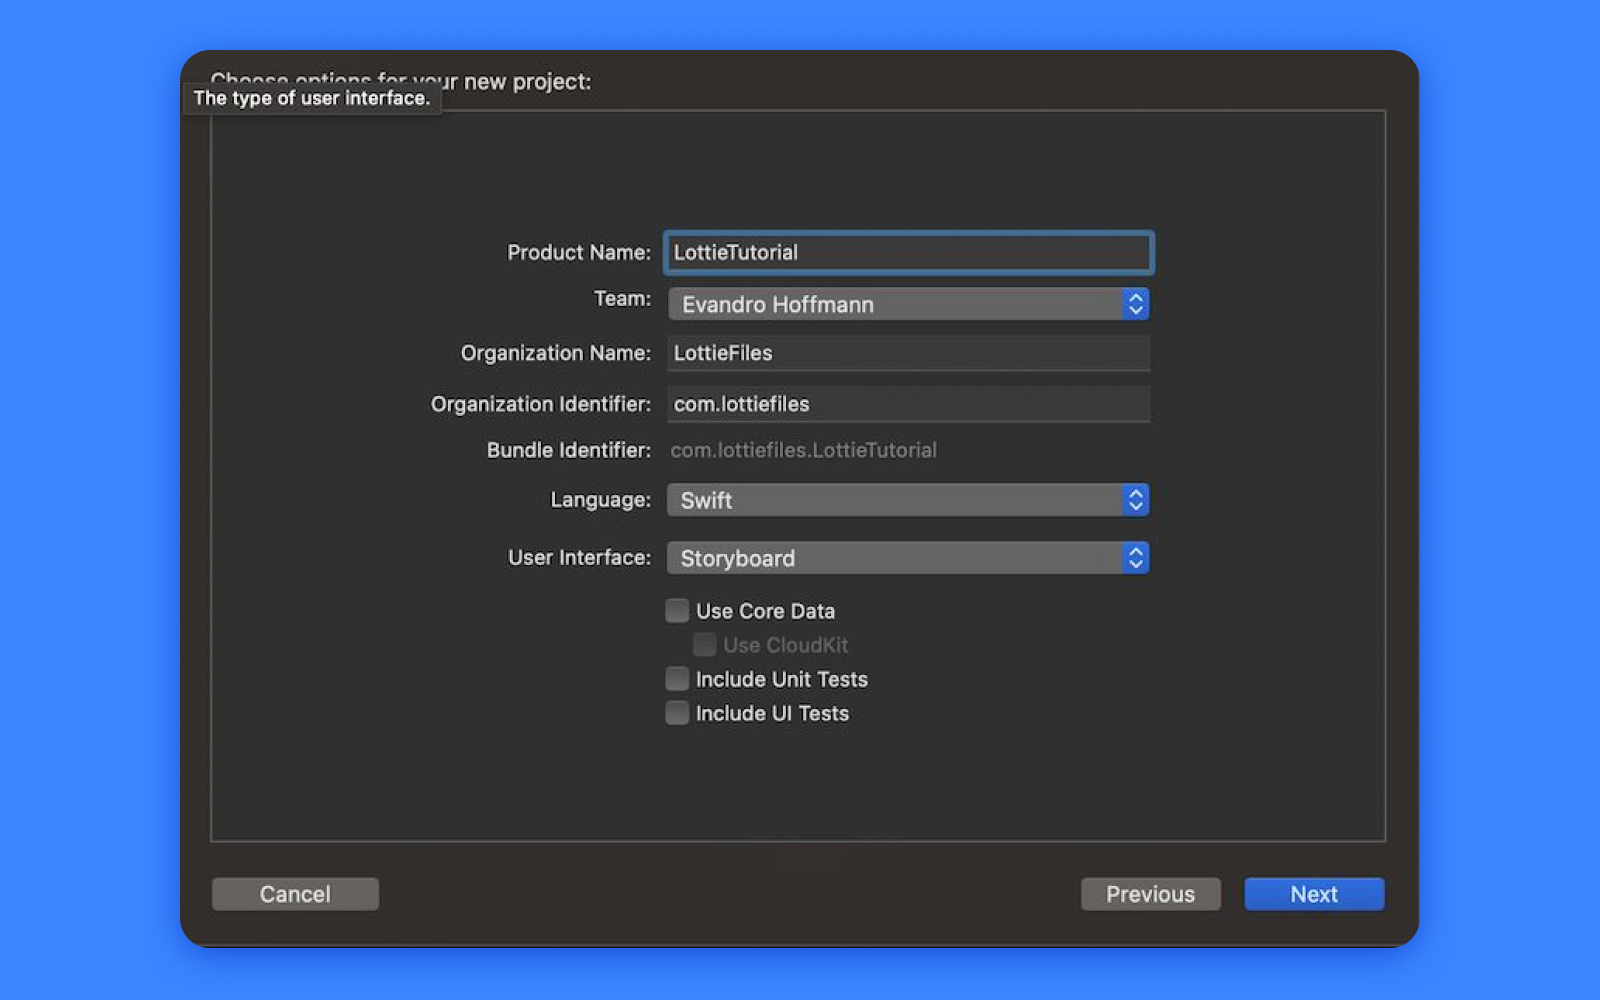
- Add the name of the project, organization and identifier. Select Swift and Storyboard. Tap Next and Create.
Awesome, we have the project ready, now let's add the Lottie library. There are a few ways to add Lottie to our project, but in this tutorial, we'll use Swift Package Manager (SPM). Note that in the video version of this tutorial above, we've used CocoaPods – you can still can use CocoaPods if you prefer, but using SPM cuts out a bit of work.
So here's how to do it: with Xcode in focus, at the top navigation bar, select File->Add Packages…, then on the top, right tap on Search or Enter Package URL and enter the URL:
https://github.com/airbnb/lottie-ios.git
Tap on Add Package at the bottom right corner and select your project as target. And we are done with the integration! 😄
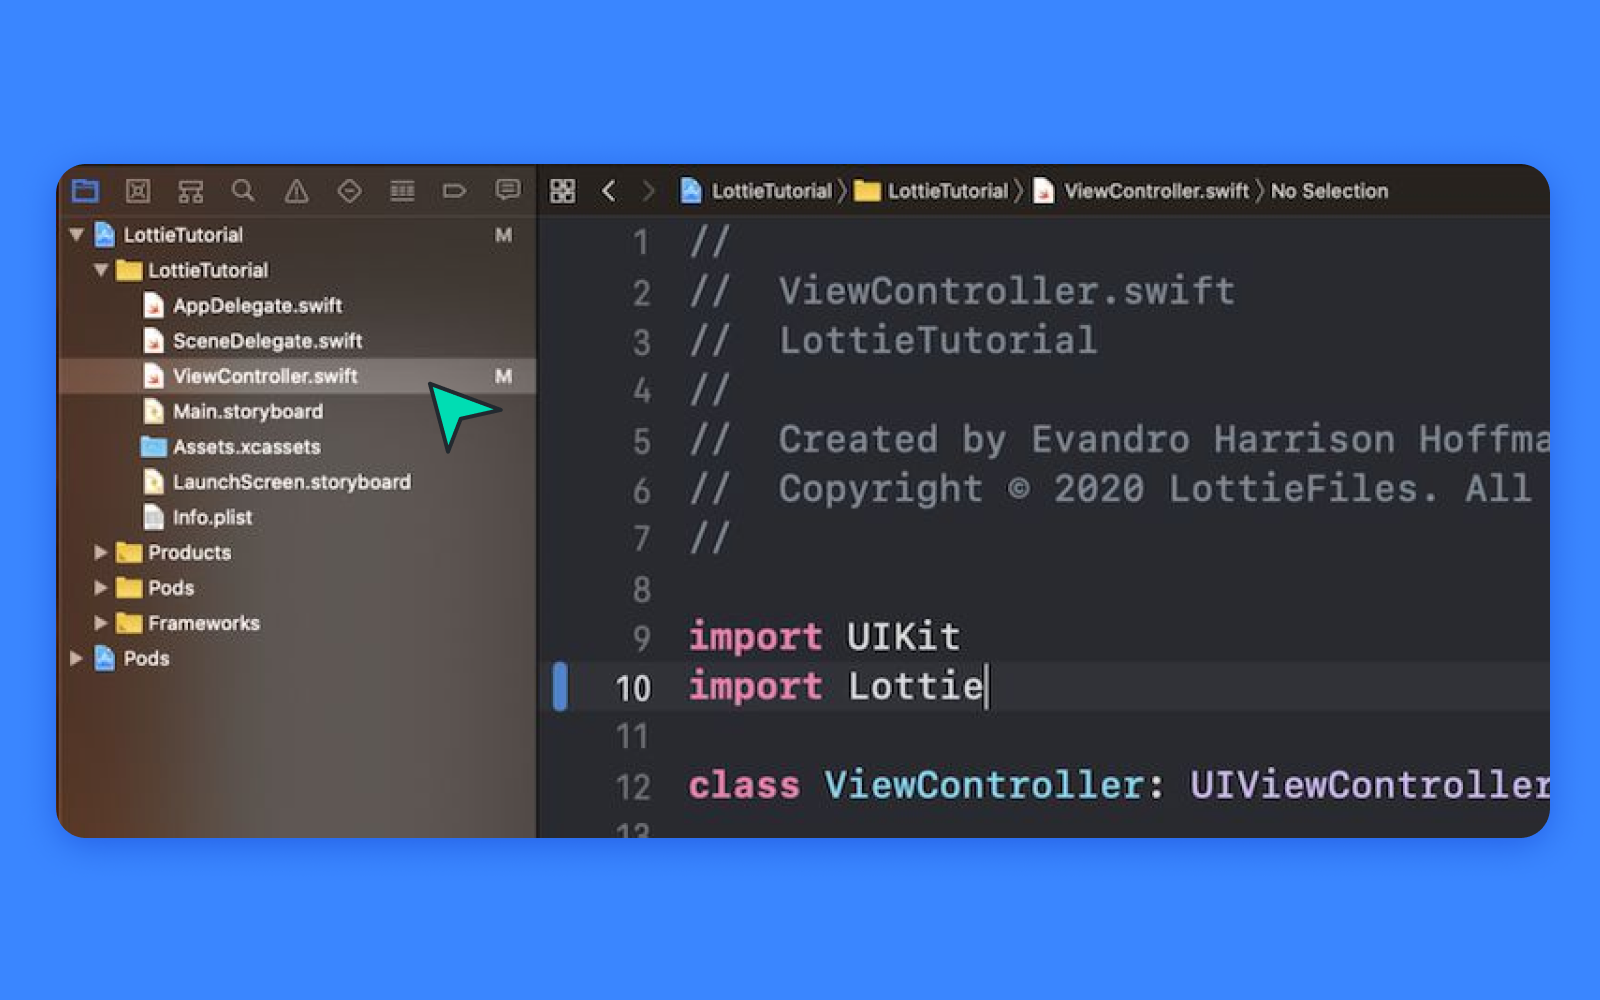
Now, navigate to ViewController.swift, add the following line to the top of the file.
import Lottie
CMD+B and make sure everything is ok.
Great, now for the fun part! Let’s get animated!!!
You can choose from thousands of free animation on LottieFiles but for the purpose of this tutorial we'll be doing together, we’ll be using this animation to start with.
As sometimes not all Lottie features are supported by iOS, it's super important to test that your chosen Lottie works on iOS. To do this, make sure you download the LottieFiles app for iOS and scan the QR code that is generated at the bottom under any animation that is either uploaded to or tested on LottieFiles. Once you're confident your animation looks and plays how it should, download the Lottie file.
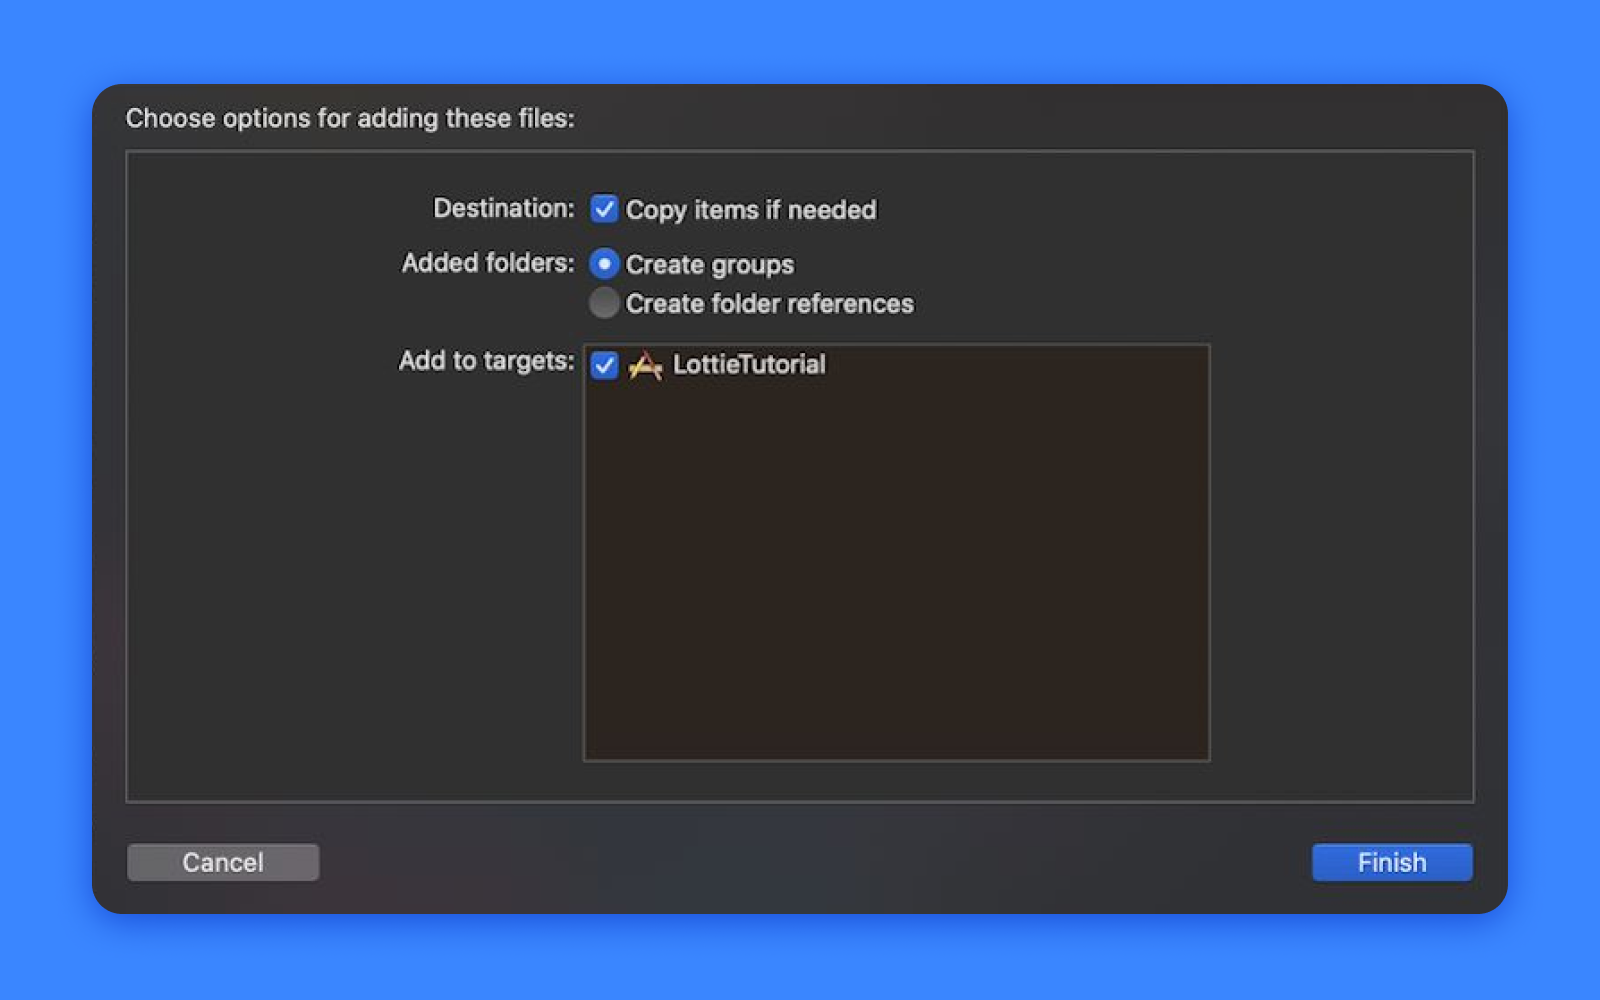
Once downloaded, drag and drop to the project, making sure our project is selected as target and copy items if needed is selected.
Adding a Lottie animation view by code
In the ViewController.swift file, replace the method viewDidLoad with the following:
// 1. Create the LottieAnimationView
private var animationView: LottieAnimationView?

override func viewDidLoad() {

  super.viewDidLoad()

  // 2. Start LottieAnimationView with animation name (without extension)

  animationView = .init(name: "coffee")

  animationView!.frame = view.bounds

  // 3. Set animation content mode

  animationView!.contentMode = .scaleAspectFit

  // 4. Set animation loop mode

  animationView!.loopMode = .loop

  // 5. Adjust animation speed

  animationView!.animationSpeed = 0.5

  view.addSubview(animationView!)

  // 6. Play animation

  animationView!.play()

}
You did it! Press CMD+R and here’s what you should see:
At this point, I really encourage you to play around with different configurations.
Adding a Lottie animation view using Interface Builder
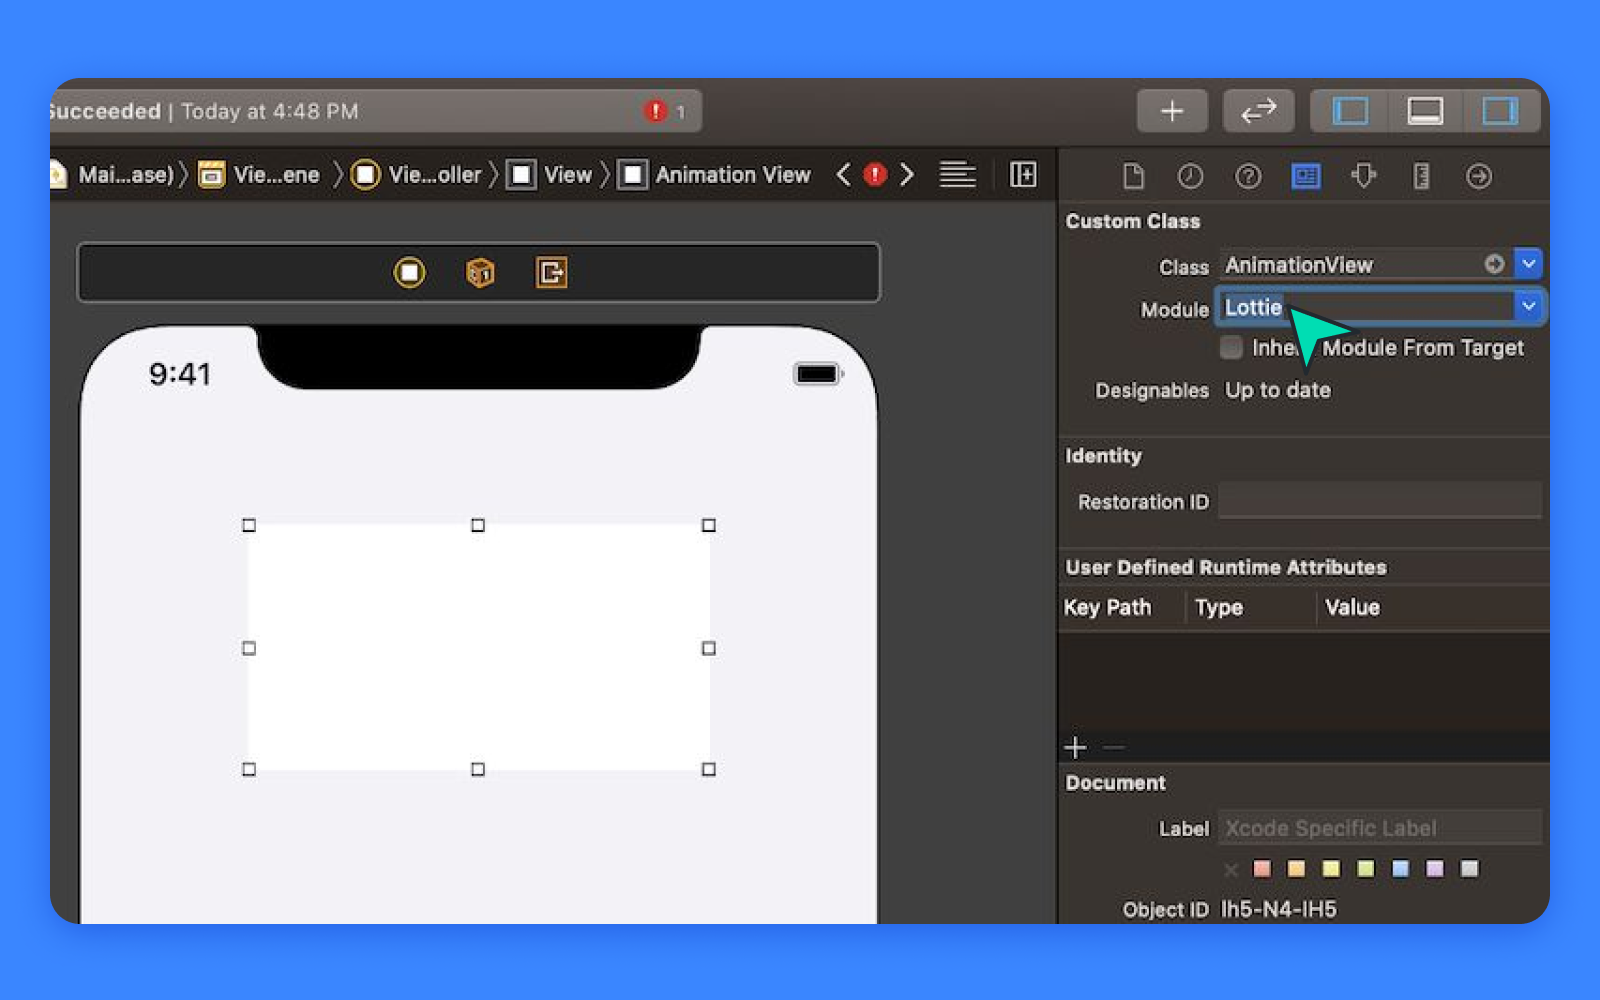
In your Storyboard or Xib file, drag and drop a UIView to your ViewController, add the desired constraints and position as you like. Then on the top right corner, navigate to Identity Inspector, change class to LottieAnimationView and set module to Lottie.
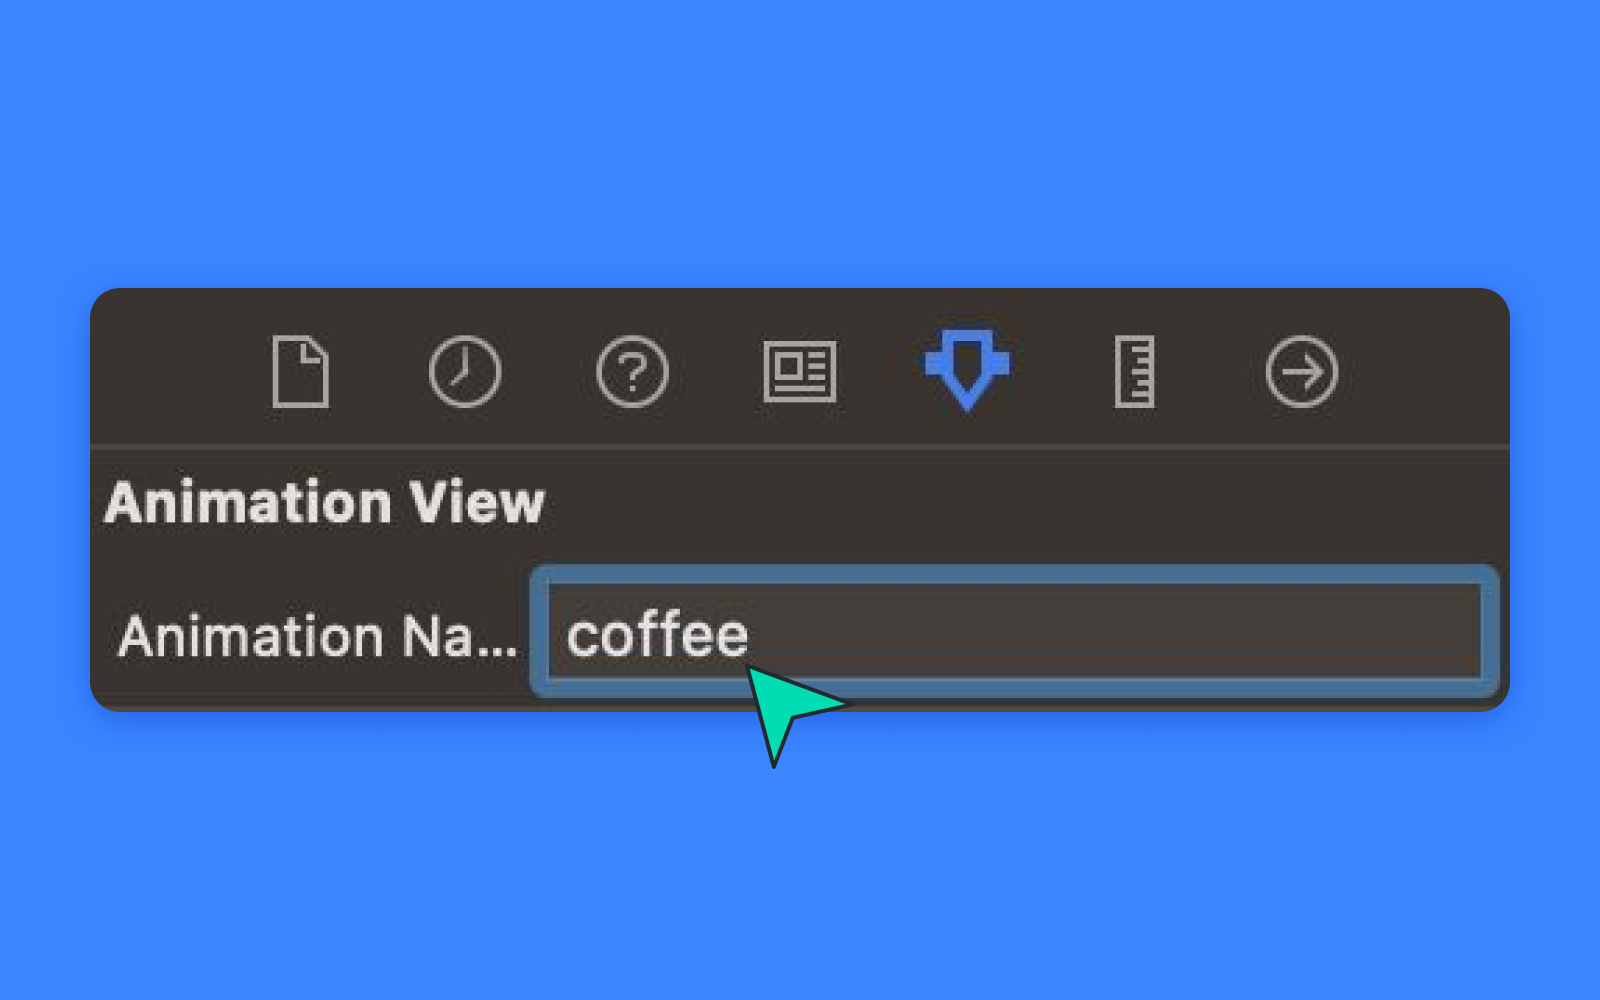
Then in the top right corner, navigate to Attribute Inspector and add the name of the animation file (without the extension).
In your Keyboard, press CTRL+OPTION+CMD+ENTER to open ViewController class and OPTION+Drag view to top of the ViewController Enclosure.

Once linked, close the right side Editor and navigate to ViewController.swift. Replace the function viewDidLoad with the following:
override func viewDidLoad() {

  super.viewDidLoad()

  // 1. Set animation content mode

  animationView.contentMode = .scaleAspectFit

  // 2. Set animation loop mode

  animationView.loopMode = .loop

  // 3. Adjust animation speed

  animationView.animationSpeed = 0.5

  // 4. Play animation
  animationView.play()
}
And test it out by pressing CMD+R. The results should be similar to the ones above, considering how you placed the view.
Using progress animations
Great, so now you know how to use Lottie animations, but next your application needs a touch of extra magic, to enable you to control how your animation plays, such as having progress bars or animations that have different states. For this example, we’ll be building a download progress animation with this file. Same as before, download the file and drag and drop to the project.
When opening the file in LottieFiles, you’ll be able to slide through the animation progress.

If you are careful enough, you’ll be able to locate the exact frame of each part of the animation (located in the left bottom corner). In the example above, we’ve located 3 key frames:
- start of progress: 140
- end of progress: 187
- download complete: 240
What about the remaining frames?
- 0->140: start of animation
- 240->320: reseting to original state
Having those values, we will create an enum to make it easier for us to use:
enum ProgressKeyFrames: CGFloat {

  case start = 140

  case end = 187

  case complete = 240

}
And now, setup the LottieAnimationView in viewDidLoad:
private var progressView: LottieAnimationView?

override func viewDidLoad() {

  super.viewDidLoad()
  // make sure the name of the animation matches the imported file

  progressView = .init(name: "download")

  progressView!.frame = view.bounds

  progressView!.contentMode = .scaleAspectFit

  view.addSubview(progressView!)

}
And we add 3 more functions, to start the download, to progress to completion and finally to complete the download.
// start the download

private func startProgress() {

  // play from frame 0 to the start download of progress

  progressView?.play(fromFrame: 0, toFrame: ProgressKeyFrames.start.rawValue, loopMode: .none) { [weak self] (_) in

    self?.startDownload()

  }

}

// progress from 0 to 100%

private func startDownload() {

  // play animation from start to end of download progress

  progressView?.play(fromFrame: ProgressKeyFrames.start.rawValue, toFrame: ProgressKeyFrames.end.rawValue, loopMode: .none) { [weak self] (_) in

    self?.endDownload()

  }

}

// download is completed, we show the completion state

private func endDownload() {

  // download is completed, we show the completion state

  progressView?.play(fromFrame: ProgressKeyFrames.end.rawValue, toFrame: ProgressKeyFrames.complete.rawValue, loopMode: .none)

}
And finally, to test it out, add the following after the end of the method viewDidLoad.
override func viewDidAppear(_ animated: Bool) {

  super.viewDidAppear(animated)

  startProgress()

}
That’s it, you may now run the application and here’s what you should see:
Awesome! We have the full animation! However, you might be interested in knowing how looks like when downloading a file. Here’s how:
First, we’ll replace startDownload function with the following:
// start download

private func startDownload() {

  // 1. URL to download from

  let url = URL(string: "https://archive.org/download/SampleVideo1280x7205mb/SampleVideo_1280x720_5mb.mp4")!

  // 2. Setup download task and start download

  let configuration = URLSessionConfiguration.default

  let operationQueue = OperationQueue()

  let session = URLSession(configuration: configuration, delegate: self, delegateQueue: operationQueue)

  let downloadTask = session.downloadTask(with: url)

  downloadTask.resume()

}
Then, to handle the download task events, add this code to the bottom of your ViewController.swift file.
// MARK: - Download Delegate

extension ViewController: URLSessionDownloadDelegate {
  // handles download progress

  func urlSession(_ session: URLSession, downloadTask: URLSessionDownloadTask, didWriteData bytesWritten: Int64, totalBytesWritten: Int64, totalBytesExpectedToWrite: Int64) {

    let percentDownloaded: CGFloat = CGFloat(totalBytesWritten) / CGFloat(totalBytesExpectedToWrite)

    DispatchQueue.main.async {

      self.progress(to: percentDownloaded)

    }

  }


  // finishes download

  func urlSession(_ session: URLSession, downloadTask: URLSessionDownloadTask, didFinishDownloadingTo location: URL) {

    DispatchQueue.main.async {

      self.endDownload()

    }

  }

}
Finally, to show the animation in the right progress, we add the following code after startDownload function:
// sets download progress

private func progress(to progress: CGFloat) {

  // 1. We get the range of frames specific for the progress from 0-100%

  let progressRange = ProgressKeyFrames.end.rawValue - ProgressKeyFrames.start.rawValue

  // 2. Then, we get the exact frame for the current progress

  let progressFrame = progressRange * progress

  // 3. Then we add the start frame to the progress frame
  // Considering the example that we start in 140, and we moved 30 frames in the progress, we should show frame 170 (140+30)

  let currentFrame = progressFrame + ProgressKeyFrames.start.rawValue

  // 4. Manually setting the current animation frame

  progressView?.currentFrame = currentFrame

  print("Downloading \((progress*100).rounded())%")

}
Press CMD+R again to run the code and you should see the same effect as before, but this time, showing the progress of a real download. Pretty neat ey?
Get more in your iOS app with our most optimized format - dotLottie
Alright, but we are not done yet! You probably noticed that you can also use dotLottie animations instead of JSON animations, right? You can read all of about it here, but as a brief explanation, it is an evolution of the Lottie format created to address some limitations of the original Lottie format.
This file format gives developers a more efficient way to implement animations as it uses ZIP tech for compression, which reduces your file size up to 80% more than a standard Lottie. It's essentially a subset of Lottie that can include multiple Lottie animations, images, and other assets all packaged in a single file and still uses the .lottie extension.
We also offer developers Lottie Runtimes, as well as independent runtimes and libraries to render Lottie animations. We are compatible with dozens of libraries and runtimes from other major tech companies and platforms which includes iOS.
When downloading animations from lottiefiles.com, note that you can also download the dotLottie files and compare their sizes:
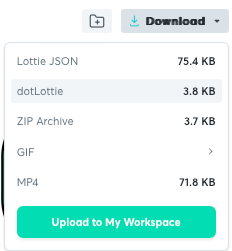
Such a difference, right?!! So here's how to use it in iOS. Make sure you have the latest lottie-ios framework installed and add this code:
// load a dotLottie animation in LottieAnimationView

DotLottieFile.loadedFrom(url: <URL_TO_LOTTIE>) { result in
   guard case Result.success(let lottie) = result else { return }

   // loads dot lottie with first animation
   animationView.loadAnimation(from: lottie)
}
This concludes our tutorial. By now, you should be able to play with animations and control their progress. Imagine the possibilities that lie ahead of you. So don’t waste any more time, let the magic flow in your iOS applications!

The complete code for this tutorial can be found here.
Happy coding!
Learn more about what else you can do with Lottie on our Working with Lottie animations blog section.