Words from a designer to a designer. How you too can find inspiration and start working with Lottie animations from motion designer David Probst Jr.
If you haven't already, read about David and his journey with Lottie here in an interview with LottieFiles.

Finding Inspiration
I spend a lot of time on Instagram, Dribbble and LottieFiles looking at loads of inspirational work from other artists, saving posts and creating collections around different ideas, art styles, tutorials, etc. I hold onto the bits and pieces that resonate with me the most and find ways to mix, match and incorporate these ideas into my own work.

Looking outside the sphere of animation and design can also be a great source of inspiration. Go on a hike, read a book, keep a dream journal, play an instrument! When exploring different techniques and art styles I find that these external influences often inspire the direction and theme of what I actually want to create.
And there are so many animators I look to for inspiration! Emanuele Colombo, Andrew Vucko, Arm Sattavorn, Markus Magnusson, Ben Marriott, and the list goes on. Some of my favorites studios are Gunner, Buck, The Furrow and Animade!
Getting started with animation and motion design
Animation can take many forms; there’s 2D, 3D, hand drawn, stop motion and all of these can be combined in various ways. Explore what’s out there and see what inspires you the most. When it comes time to learning the tools I find it’s best to pick one and focus your efforts for a while before jumping to something else.
Learn the fundamentals of both design and animation, this knowledge is far more valuable than any fancy tools or plugins. When it comes to motion, learning Disney’s 12 Principles of Animation will become an invaluable guide on your journey as an animator. I recommend reading “The Illusion of Life” and “The Animators Survival Kit”, these books are jam packed with all kinds of golden nuggets of wisdom.
Invest in yourself. There’s an abundance of knowledge available either for free on youtube or through paid online courses. School of Motion has some killer kickstart courses for people wanting to learn after effects, cinema 4d, illustrator and more. Motion Design School and Mograph Mentor are great too!
How I come up with my Lottie animations
I start off by formulating a game plan; who is this for? What’s the purpose of this animation? Is the motion snappy, whimsical, elegant? Try to understand the goals of what you’re creating so you can narrow down the scope of exploration.
Next I focus on technical considerations. Where will this be displayed? E.g. If it’s a web only animation then I’m free to use expressions, but if it’s for iOS then everything needs to be keyframed. I consider different ways to accomplish the animation within the given parameters then choose the most optimized workflow.
Once I’ve answered all the relevant questions animating becomes pretty straightforward. If it’s something really simple I just dive right into creating the desired motion, but if it’s more complex I usually animate in stages; blocking out my poses with hold keyframes first then adding easing and other details afterwards.
Quick Lottie animation tips
Quick tip 1: Need to create multiple instances of an animated layer? You may be inclined to just duplicate the layer, but doing so would also duplicate all the keyframes, which increases the size of the JSON when you go to render. This really adds up if you have a big stack of duplicated layers! Instead, try precomposing the original layer first, then simply duplicate the precomp. Each instance of the precomp is now being driven by a single set of keyframes, which means less work for Lottie and a smaller JSON file. Let’s say your animating a character walk cycle; usually each set of limbs has the same animation just offset in time. Try animating one leg, precompose the layer, duplicate the precomp, and offset the duplicated layer in time. You now have two legs for the price of one, and you can do the same for the arms as well.
Quick Tip 2: Features like auto-trace are great when it comes to converting 3d renders into Lottie friendly shape layers, but it adds a TON of keyframes, the path itself is usually a mess, and it can bloat your file size. As an alternative, try exploring manual path animation. With a little bit of elbow grease you can “trace” a reference layer or find ways to create the illusion of depth without going full 3D.
My go to animation tools
AEUX – This is the best tool I’ve come across for transferring visual designs from Sketch and Figma into After Effects. It has a number of useful import settings and it’s free!
Ray Dynamic Color – Uses expressions to link all of your color values to a color palette. Any changes to the palette will automatically update the associated layers throughout the project.
Overlord – This is one I could not live without! It’s essentially a portal between after effects and illustrator. With the click of a button you can push and pull layers back and forth between apps.
Ease copy – Have you ever wanted to copy the easing values from one set of keyframes to another? This script allows you to do so with a simple ease copy, ease paste function.
Lazy – There’s a handful of scripts out there for layer sequencing, but Lazy combines this feature with a simple graph editor. You can actually offset your layers and keyframes along the specified Bezier curve!
Where I get most of my work done

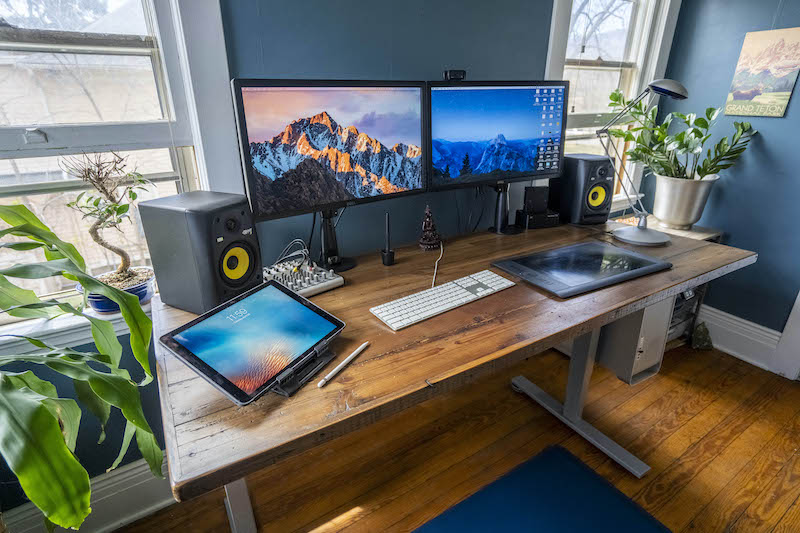
All of my work is done remotely from my home office. I have an Uplift desk that enables me to sit or stand -- best investment ever. Under my desk I’m rocking a classic MacPro; it’s a 12 core with 64 gigs of ram and an NVIDIA GTX 780 graphics card. On top, I have two 27” Dell monitors, a little Buddha statue that reminds me to stay calm when AE crashes, and a Phillips hue light strip that adds a splash of color to the wall.
See David's work on his LottieFiles profile and his website.


